Oct 06

Fix WLM after Windows 10 2004 Update

Windows Live Mail Error 0X800C013E After Update 2004 – Solved

I recently updated my main Windows 10 machine to the latest 2004 feature update and all seemed to go well until I opened my email client, Windows Live Mail (WLM), and was unable to send or receive new messages due to an error marked 0X800C013E. As is the case with most of Microsoft’s error codes, this one is fairly generic with multiple solutions proffered online involving a protracted process of trial and error. However, this one was immediately after updating to Win10 2004 so that narrowed the field down considerably. I came across a solution that appeared to work for other users in the same predicament so decided to give it a go myself– and I’m happy to report that it worked for me too.

So, if you are a Windows Live Mail user and it is no longer working properly after applying the 2004 update, here is what to do. Now, this fix involves editing the registry so the usual warning applies:

Standard Registry Editing Warning: The following instructions will ask you to edit your Windows Registry. Be sure to make a backup of your Registry before you make any changes. Making mistakes in the Registry can cause hard-to-diagnose problems, or even keep Windows from functioning properly.

Close Windows Live Mail and open the registry editor:

  1. Use the Windows key + R to open a Run Box
  2. Type Regedit and hit Enter
  3. In the Registry Editor that opens, follow this path down the left panel:

Computer\HKEY_CURRENT_USER\SOFTWARE\Microsoft\Windows Live Mail

Now, we’re going to create three new DWORD (32-bit) entries:

  • RecreateFolderIndex
  • RecreateStreamIndex
  • RecreateUIDLIndex

All three with a Data Value of one (1).

Right-click Windows Live Mail in the left-hand pane and from the menu point to New and then click DWORD (32-bit) Value:Registry WLM New DWORD

A new DWORD value will now display in the right pane as NewValue#1. Rename it by right-clicking it and choosing Rename. Type in the new name as per the above. Now we’re going to assign a data value; double-click the new DWORD, assign the value 1 (one) and then click OK.
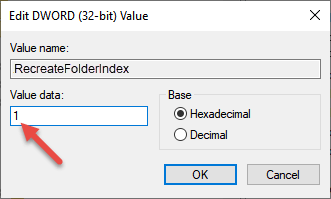
Registry Value Data

FOOTNOTE:

I realize I’m an old stick-in-the-mud still using Windows Live Mail but I’ve been using it for years and it’s something I’m used to and very familiar with. I’ve tried alternative email clients, such as Thunderbird for example, and haven’t been overly impressed, and I am not a fan of webmail. I guess one day, in the not too distant future, I’ll be forced to change to something else but in the meantime, I’m happy to stick with the devil I know.

This article was copied from https://davescomputertips.com/windows-live-mail-error-0x800c013e-after-update-2004-solved/ to ensure it does not get “lost”

Dec 11

Tell both NuGet and TFS to ignore the packages folder

Here’s the deal: We have to tell both NuGet and TFS to ignore the packages, because NuGet is trying to do source-control related stuff that it absolutely shouldn’t be doing (bad form, Microsoft!). So you have to do two things.

First, add a file named .tfignore to the solution folder (note the lack of s after the tf). It’s contents should be as follows:

# Ignore NuGet packages
\packages
!\packages\repositories.config

# Ignore hidden .vs folder
.vs

# Optional :-

# Ignore autogenerated folders (Mainly Azure Workers)
ecf
csx
rcf

The first three lines tell TFS to ignore your packages folder, the other lines are to exclude other special folders. You need to explicitly include repositories .config as it’s part of the NuGet stuff I outline below. (Double negative in exclude list above.)

OK, so now thanks to our .tfignore file, TFS is ignoring your packages and other special folders. Everything is fine, right? WRONG, because NuGet is mucking around with your source control and adding the packages to your pending changes. So now let’s tell NuGet to stop doing this.

  1. Create a physical folder called “.nuget” {tip in Windows Explorer type “.nuget.” as folder name to create it}.
  2. Add a virtual folder called “.nuget” in the root of your solution folder.
  3. Now, create a file called “NuGet.config”, in the physical folder then add it to the virtual folder.
    It’s contents should look like this:
<?xml version="1.0" encoding="utf-8"?
<configuration>
  <solution>
    <add key="disableSourceControlIntegration" value="true" />
  </solution>
</configuration>


<?xml version="1.0" encoding="utf-8"?> <configuration> <solution> <add key="disableSourceControlIntegration" value="true" /> </solution> </configuration>

And now your packages should stay out of source control. Just remember to add the “nuget.config”, “nuget.targets” and “.tfingore” files to source control so they never get lost.

1. Add the folder using Source Control Explorer; right-click the solution->Add folder->.nuget
2. The nuget.config file MUST go in the .nuget folder. Even if you already have a nuget.config file in the root of your solution folder (because, say, your company has an internal nuget feed). Yes, that means you’ll have two nuget.config files, one in the .nuget folder and one in the solution root. My testing indicates that’s the way it has to be. Additionally, if you do have a custom feed, ensure that you have both the custom feed and nuget.org as keys in the Nuget.config file, or sometimes TFS will randomly decide it can’t restore the packages.

Here’s some documentation for you: http://msdn.microsoft.com/library/vstudio/ms245454(v=vs.110).aspx#tfignore

Mar 09

Completely clear All event logs

Open an elevated PowerShell console

wevtutil el | Foreach-Object {Write-Host “Clearing $_”; wevtutil cl “$_”}

Mar 09

Recursively delete all .svn folders

Direct in CMD Prompt
FOR /F “tokens=*” %G IN (‘DIR /B /AD /S *.svn*’) DO RMDIR /S /Q “%G”

In Batch file
FOR /F “tokens=*” %%G IN (‘DIR /B /AD /S *.svn*’) DO RMDIR /S /Q “%%G”

Sep 16

Browser Info

Chose a browser Browse Happy

HTML5 Test here

Acid Test here

Sep 15

Enable Hidden Administrator

Enable

net user administrator /active:yes

Disable

net user administrator /active:no

Sep 01

How to enable the F8 key to start Safe Mode in Windows 8

To enable the F8 key in Windows 8; Open an elevated command prompt and enter the following command:

bcdedit /set {default} bootmenupolicy legacy


If you would like to disable the F8 key and go back to the original Windows 8 setting; Open an elevated command prompt and enter the following command:

bcdedit /set {default} bootmenupolicy standard

Aug 05

Office 2010 Direct Download Links

http://www.heidoc.net/joomla/technology-science/microsoft/18-office-2010-direct-download-links


Aug 05

Take Ownership of Folder and Files

Take Ownership

takeown /f {folder} /r /d y
icacls {folder} /grant administrators:f /t

Prevent S.V.I. from being used on External HDD

rmdir "System Volume information" /S /Q
echo placeholder > "System Volume Information"

Source

Apr 09

BIOS Recovery Keys

Starting a recovery via the BIOS recovery partition usually means that you have to press one of the “F” keys (such as F1-F12) the moment after you hit the power button. These should be:

  • Acer – Alt + F10
  • Asus – F9
  • Dell/Alienware – F8
  • HP – F11
  • Lenovo – F11
  • MSI – F3
  • Samsung – F4
  • Sony – F10
  • Toshiba – 0 (not numpad) while turning on, release key when Toshiba logo appears

Older posts «